|
||||||||
| HOME | METHODS | LINKS | NEWS | TIPS | SOFTWARE | FORUM | CONTACT | SEARCH |
| Ligating an insert into a plasmid vector |
|||||||||||
|
Molecular cloning is a basic method of modern molecular biology. Without cloning many experimental approaches would be impossible. Although this method is a routine method today I still meet many people that have difficulties in setting a ligation reaction. Here I give some general guidelines and examples that will help you. For routine cloning you will need a T4 DNA ligase. This enzyme can be purchased from many different companies, usually from the same companies that produce restriction enzymes. About 3 years ago several companies introduced so called rapid ligase. In my lab we use rapid ligases from Roche and Fermentas. Strangely enough some people want to use only Roche, and I prefer Fermentas, since it’s a bit cheaper but works equally well. To ligate a DNA fragment into a plasmid vector you have first of all to prepare your fragment and your vector in a way that your fragment can be inserted into the vector. For this fragment (also called insert) and vector must have compatible ends after digestion. If you use for the digestion of your insert and vector the same enzyme, producing cohesive ends the ends of your DNA fragments will be compatible anyway. All blunt ends are compatible with each other. However there are some restriction enzymes that have different recognition sites, but compatible cohesive. This creates a possibility to clone insert digested with one enzyme into a vector digested with a different one. You can check catalogue for such compatible enzymes, one example is a pair SalI and XhoI. The most critical component of the reaction is your vector. It has to be digested as good as it possible, therefore I recommend to set a reaction in a relatively big volume (50-100 µl). Use excess of restriction enzyme and prolong incubation (however don’t forget about star activity!). Although there are always debates regarding the necessity of dephosphorylation of the vector, I recommend dephosphorylating the vector in any case. Even if you use two different enzymes for digestion, additional dephosphorylation will reduce the background coming from religation of the empty vector. Make a fresh agarose gel and run it slower than usual. Digested vector has to be very good separated from the non-digested one. Insert preparation is less critical, since it is usually easier to separate it from the source plasmid. One more tip here. If your insert has the same size as the remaining part of the source vector (so you can’t separate them on a gel) find enzymes that cut your vector, leaving the insert intact. Here is one more point that appeared to be very important for our cloning many years ago. When cutting your DNA fragments out of the gel pay attention that you use 320 nm UV, and not 265 nm. Longer wavelength will cause less damage of your DNA and improve ligation efficiency. Well, so you have your vector, you have your insert and you checked them on a gel. What now? How much vector should I take for the ligation? How much insert? Lab manual usually say “molar ratio 1:3 vector:insert”. This vector:insert ratio is fine, but most people usually have difficulties in estimating the amounts. First advice: don’t measure concentrations of your digested and purified vector or insert photometrically! Some isolation methods will lead to wrong measurements. Just look at your gel picture and estimate how much one band is stronger than the other. Usually the stronger one is the vector. Having this estimation and the volume you loaded on the gel you’ll be able to estimate the “relative concentrations” of vector and the insert. To decide how much to take for the ligation you will need several values. First of all you need sizes of vector and insert. These will be Sv and Si; then the relative intensities on the gel Iv and Ii (in most of the cases the intensity of the weaker band will be taken as 1); the volumes you loaded on the test gel Vv and Vi (usually they are equal, but if you load different you’ll need them). Finally you need the volume of the vector you want to use for your ligation, this will be Lv. To calculate the volume of the insert you have to take for your ligation reaction use the following formula:
If you get insert volume smaller than 1 µl, probably you have to dilute it. If the volume is too big for the reaction, take as much as you can. I also created an Excel file that contains this formula, you can find it here. with rapid ligase from Fermentas looks like this
Don’t forget the second reaction where you use water instead of the insert. This will be the control of vector re-ligation. I usually incubate this reaction for 30 min at RT. However you can incubate it as short as 5 minutes, this seems to be sufficient. Use 5 µl of this reaction for transformation of chemically competent E.coli. Example 1
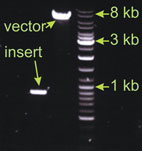
This is a classical ligation with relatively big vector (7 kb), but small insert (0.9 kb). I estimated the vector band intensity to be 4 fold stronger than the insert. For the ligation I took 2µl of the vector (the amount loaded on the gel) and 1.5 µl of the insert. Example 2
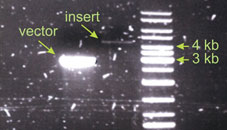
In this case I did not get enough insert. The intensity of the insert band can be estimated to be 20 fold weaker than that of the vector. The insert is also bigger, it is about 4.5 kb. According to the formula I should have taken take 90 µl of the insert for the ligation! Since this was not possible I took just as much as I could – 13µl. And this functioned well enough. Than means the amounts of vector and insert in the ligation reaction are not the most critical parameters. If your DNA is not damaged and you use correct restriction enzymes your ligation will work properly. Links
|
|||||||||||
| \METHODS\DNA\Ligation | |||||||||||
| © Copyright 1999-2007 Alexei Gratchev. All rights reserved. | |||||||||||